In October our pastor asked our small quilting group if we would consider making a T-shirt quilt for his daughter from t-shirts collected from various United Methodist youth gatherings. The group agreed and we were given 13 t-shirts with 36 images! None of us, as far as I know, had made a t-shirt quilt before. The shirts sat, gathering dust, for a month before I finally bit the bullet and volunteered to take on the project. If nothing else, I figured it would be good practice - my daughter has been saving t-shirts for several years!
The good part!
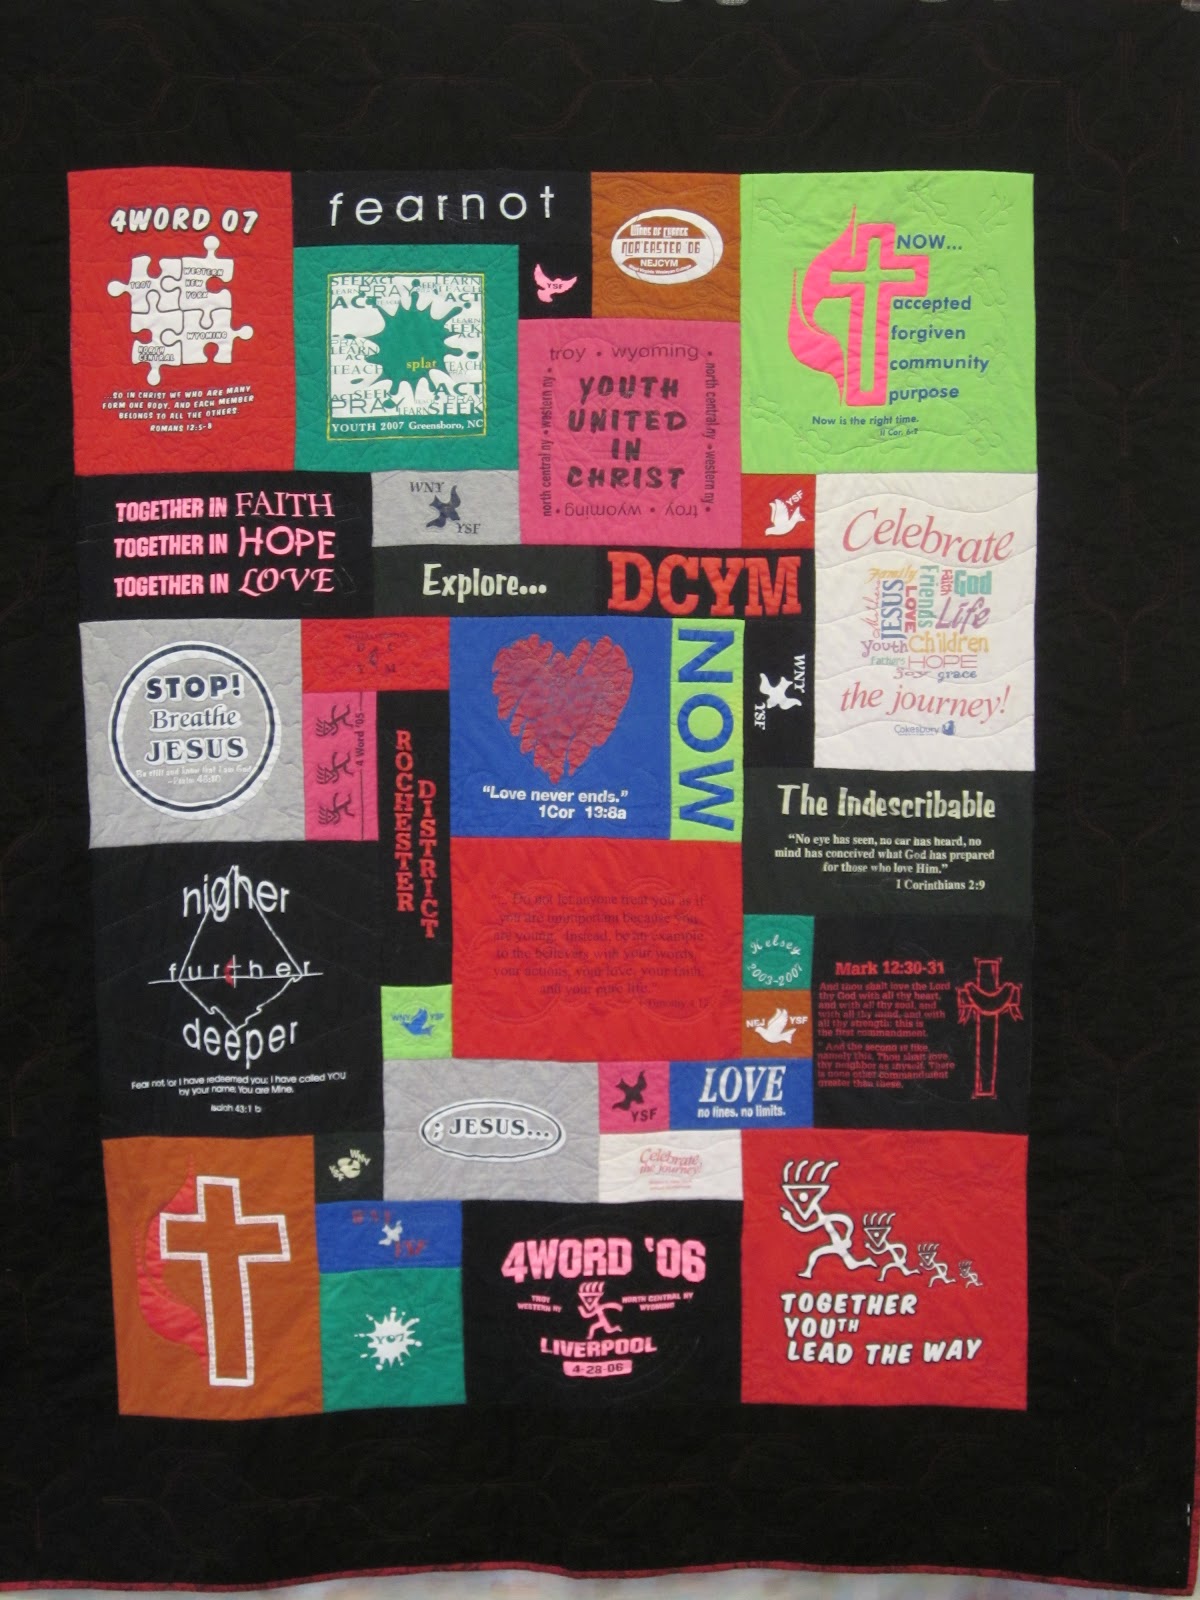
I'll get to the good part first... I finished it! It turned out so much better than I expected. Here's what it looks like. I'll post close-ups too.
 |
| Kelsey's T-shirt Quilt |
|
|
|
And now, for the rest of the story...
Since I hadn't made a t-shirt quilt before, I started searching the internet for instructions. I knew people that had made them, and understood the basics of cutting them into squares and putting sashing around them so they'd all be the same size. I had heard how I would have to stabilize them with iron-on interfacing before sewing them together.
But then I found
Too Cool T-shirt Quilts. They had a unique setting that really gave the quilt pizzaz! And I didn't have to use the interfacing, which I've never liked even in my regular clothes sewing (I use the sew in kind). I ordered their book and I was off on my adventure!
The first thing I did was make a sample quilt from my husbands old t-shirts and several different types of batting. The batting was scraps from my friend, Millie's, longarm quilting business.
 |
| Top to bottom - fluffy poly, flat poly, cotton blend, cotton. Right side spray basted, left size pinned |
|
I also tried June Tailor Quilt Basting Spray and pin basting. And then I tried my hand at some free motion quilting, which I had never done before either! Leah Day inspired me with her designs, her clear instructions, and her encouragement, all from her website! It didn't turn out half bad. I decided I could actually do this!
I also put this sample through the wash on laundry day. I wanted to see if the basting spray washed out, and how much those battings would shrink. Well, the glue stuff was still a bit sticky, and made the finished product more stiff than I liked. And the cotton definitely shrunk up too much for what I had in mind, so I decided to go with a polyester batting and pin basting.
 |
| Kelsey |
The first question I'm asked when I show the quilt is "You didn't use interfacing? How'd you keep it from stretching?" Well, I spray starched the bejeezus out of each shirt before I cut it! And I moved my squares as little as possible before sewing. Instead, in order to lay out the quilt, I took pictures of each shirt and imported them into Microsoft Publisher, where I re-sized the images to the exact size, cropped them, and moved them around. I managed to use all 36 images (only had to trim one down) and had to add one blank block. My friend Joan, embroidered Kelsey's name on it for me.
 |
| puzzle pieces |
Next up, batting. I had it all picked out, I just had to find it at the store. Remember, my sample was a cast off from Millie... and Millie had flown south for the winter... Two quilt stores and three trips to Joann Fabrics later and I couldn't find it anywhere! On one of the trips to Joann's, I purchased a batting, but when I got it home I decided it was too thin and not an even thickness. So back I went. I finally settled on a wonderful 50% rayon (from bamboo), 50% cotton batting by Fairfield. This stuff is soft and cuddly and drapes really nicely, and can be quilted up to 8" apart. I must have been at the store for an hour and a half going "should I or shouldn't I..." I did get sticker shock when I checked out. Original price for a queen-sized batting was $57.00!!! Thank goodness for the half-off sale plus a 30% coupon on top of that. :-)
 |
| Michelangelo - Creation of Adam |
I was still worried about the cotton shrinkage though. So, I filled my bathtub with really hot water and let the batting soak for a half hour. Unfortunately, when I drained the water I found that there was no way I could get the water all squeezed out of it. It would take a year to dry!! I took a chance and put it into my front-loading washer to spin out... Oh no!! My washer doesn't have a spin only cycle!! It has a rinse and spin, but no spin only. Praying (appropriate for this quilt!) I sent it through the rinse cycle on the comforter setting, and then sent it through the dryer. Thankfully, it came out fine!
 |
| Methodist Cross and Flame symbol |
My new found free motion quilting skills!
Some of the squares lent themselves naturally
to tracing the design.
For the others, I
looked for simple clip art of Christian symbols.
Once again, I took them to Publisher to
enlarge them to the correct size, and I printed them on regular computer
paper. Then I “sewed” on the lines with
no thread, to perforate the paper, and “pounced” baby powder through
the holes to mark the pattern on the quilt.
 |
| "pouncing" the pattern |
 |
| baby powder pattern |
I found that the powder brushed off too quickly though, so I traced the
powdery designs with a marking pencil or water soluble pen. About halfway through quilting I started
worrying that all the powder, chalk marks, and marking pencils and pens might
not wash out completely.
 |
| pattern traced with a chalk pencil |
 |
| one border all marked! |
|
|
|
 |
| the finished flame |
The border is actually the Methodist flame with a mirror image of it. It looked really neat as a single flame chain, but that left too large of an area without quilting. Some people thought that the pattern was a weird flower. Others saw uplifting hands, and still others saw a dove coming down.
 |
| butterflies |
For quilting I used Coats and Clarck 40 wt. tri-lobal polyester because I really wanted the sheen of the thread. I tried several different types of sewing machine needles from
embroidery ones to jeans needles to ball point needles specifically for
knit fabrics. The thread just kept shredding.
 |
| winds of change |
I settled on the size 16
jeans needle because it seemed to work the best.I started with a variegated rainbow color but decided it really didn't look as good as I thought it would, so I switched to gray on top and red on the bottom (to match the backing).
 |
| Add caption |
I used the "people" on this block as a pattern to fill in the large, unprinted area. My daughter thinks this little guy is "creepy."
And that brings me to the end of my saga with the t-shirt quilt. I love the way it turned out. The quilting isn't as good as I would like, mostly due to thread problems, but it's great for my first try!
Hope you enjoyed my adventure!
~ Kathy
Even more pictures!
 |
| lamb |
 |
| freehand squiggly lines |
 |
| Sonshine! |
 |
| pitcher, basin and cloth |
 |
| bread and cup |
 |
| I know I already have a shot of this square, but I liked how this picture turned out. |